Bioprint like a pro

Printing pressure

On this page, we’ll do a deep dive into the effects of pressure on a bioprinted construct. Extrusion-based bioprinting generates pressure in a cartridge to force a bioink to flow through a nozzle. Changing the amount of applied pressure changes the bioink’s flow rate, which can drastically change the resulting bioprinted construct. Pressure is just one parameter out of many to consider when bioprinting, including print speed, temperature, nozzle size and more.

Pneumatic printhead

There are two main ways in which extrusion-based bioprinters generate pressure: pneumatically and through a motor-driven plunger (i.e., syringe-based extrusion). Pneumatically driven bioprinters use either an internal or external air compressor to pump high-pressure air into the cartridge and force the bioink through the nozzle. In syringe-based extrusion, the plunger is connected to a motor through a shaft, and the motor produces the force needed to drive extrusion.

Syringe printhead

The pros and cons of each extrusion method depend on the conditions of the print. For example, the syringe-based method takes a longer time to set up because of the moving parts involved. However, the motor can start and stop applying pressure very rapidly and with much more accuracy than pneumatically driven extrusion. That’s helpful for users who work with very small volumes and low-viscosity bioinks. On the other hand, the speed enabled by pneumatic extrusion benefits users who don’t require the precision of syringe-driven extrusion.

Pressure is key

After choosing an extrusion method, you can set a pressure for your print. If the pressure is too low, then the bioink will not flow. If the pressure is too high, then the bioprinter may not be able to move quickly enough to deposit the filament onto the printing substrate. However, there is a wide range of pressures where the bioink will flow through nozzle and print properly. To choose the right one, users should keep the objective of their print in mind.
The filament in the image demonstrates the trade-off between high and low printing pressures. The inconsistent filaments toward the right side of the image were printed with low pressures, and the smoother filaments towards the left were printed at higher pressures. However, intricate features like curves, corners and multiple layers are printed more precisely at lower pressures. And when printing with cells, lower pressures minimize the cells damaged in the process.

Fast vs. slow

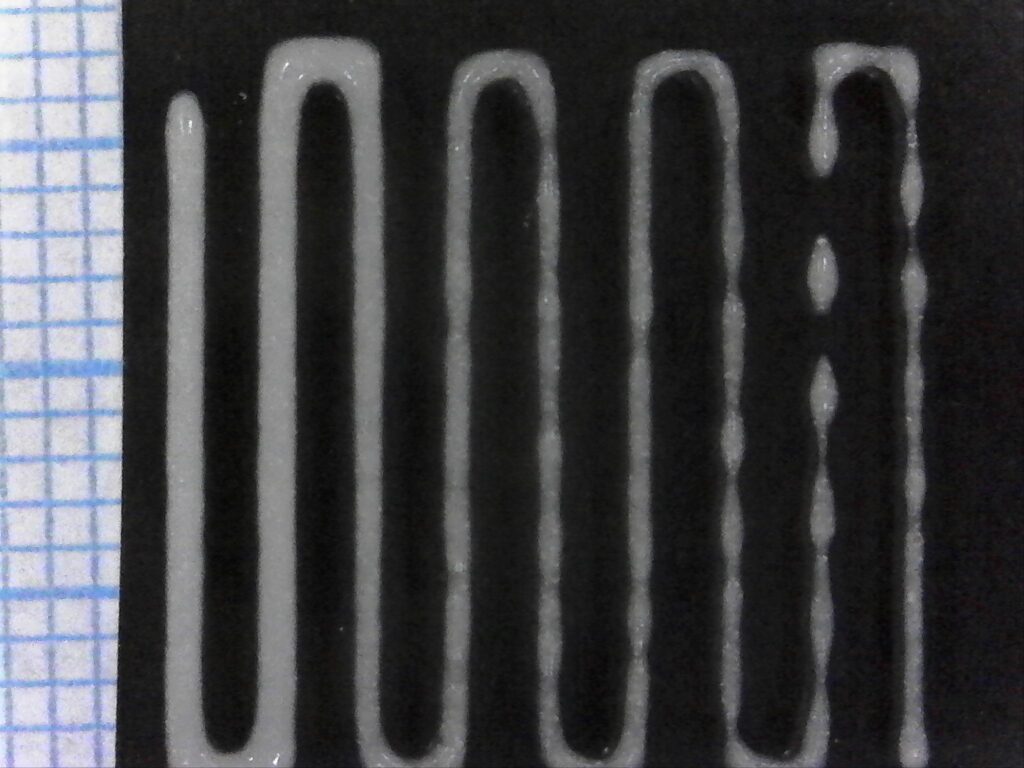
For materials with poor structural integrity before crosslinking, users can use higher pressures to print more rapidly and crosslink before the construct begins to collapse. At higher pressures, you can increase the nozzle’s translation rate along the printbed – even though more bioink is coming out more quickly, the nozzle covers more ground, depositing the same amount of bioink per length unit of the filament. Users can max out these parameters to print a construct as rapidly as possible. 


At the same time, the lowest pressure possible is not necessarily the best for printing with cells. Some bioinks require that cells be outside of incubator conditions for 15-20 minutes, and using slightly higher pressures enables users to select higher speeds, finish faster and reduce the time spent outside of the incubator.